Developers · Live Chat SDK
Install Live Chat in a Zoho Desk Help Center
Zoho Desk's customer Help Center serves your portal from Zoho's own domain and applies a strict Content Security Policy (CSP) to that page. The standard raia embed tag pasted into the Inline Script block is stripped or blocked, so the widget never appears. Adding the script programmatically from the JS Function block works, and that is the supported way to run raia Live Chat inside a Zoho Desk Help Center.
Why the normal embed fails
Zoho Desk's Help Center customization offers three code surfaces — HTML, CSS, and JS — and the JS tab is split into Inline Script and JS Function. Most people drop the standard raia embed tag into Inline Script, because that is what you would do on your own site:
<!-- Does NOT work inside Zoho Desk's Inline Script block -->
<script
  async
  src="https://raiabot.raia2.com/assets/raia-chatbot-widget.js"
  data-api-key="YOUR_AGENT_ID_HERE">
</script>
On a Zoho Desk portal that snippet does not load. The Help Center page is delivered with a Content Security Policy that restricts which origins may serve executable JavaScript, and the raia widget domain (raiabot.raia2.com / raiaboteu.raia2.com) is not on Zoho's allow list. The chat service itself is perfectly reachable — you can open the widget URL directly in a browser — but the portal page refuses to execute a <script src> tag pointing at it. In the browser console this shows up as a "Refused to load the script … violates the following Content Security Policy directive: script-src …" error, or the tag is silently removed by the Help Center's markup sanitiser.
This is a Zoho-side restriction
What you need before you start
| Requirement | Where to find it |
|---|---|
| Zoho Desk admin access | You need permission to open Setup → Channels → Help Center and customise the portal. |
| A published Help Center | Setup → Channels → Help Center → select the portal you want to edit. |
data-api-key | Your Agent ID, shown in raia Command under the agent's Live Chat Skill settings. |
| The correct widget domain | raiabot.raia2.com for US-hosted agents, raiaboteu.raia2.com for EU-hosted agents. |
Step-by-step setup
- 01In Zoho Desk, open Setup (gear icon) → Channels → Help Center and select the Help Center you want to add the agent to.
- 02Click Customize (or Customize Your Portal) to open the theme editor for the customer-facing portal.
- 03In the left panel switch to the JS tab, then select the JS Function sub-tab — not Inline Script.
- 04Paste the loader below and replace
YOUR_AGENT_ID_HEREwith your agent'sdata-api-key. - 05Click Preview to load the portal with your change and confirm the launcher appears.
- 06Click Save draft, then Publish to push the change to the live Help Center.
var s = document.createElement('script');
s.src = 'https://raiabot.raia2.com/assets/raia-chatbot-widget.js';
s.setAttribute('data-api-key', 'YOUR_AGENT_ID_HERE');
s.setAttribute('data-is-active', 'true');
s.async = true;
document.head.appendChild(s);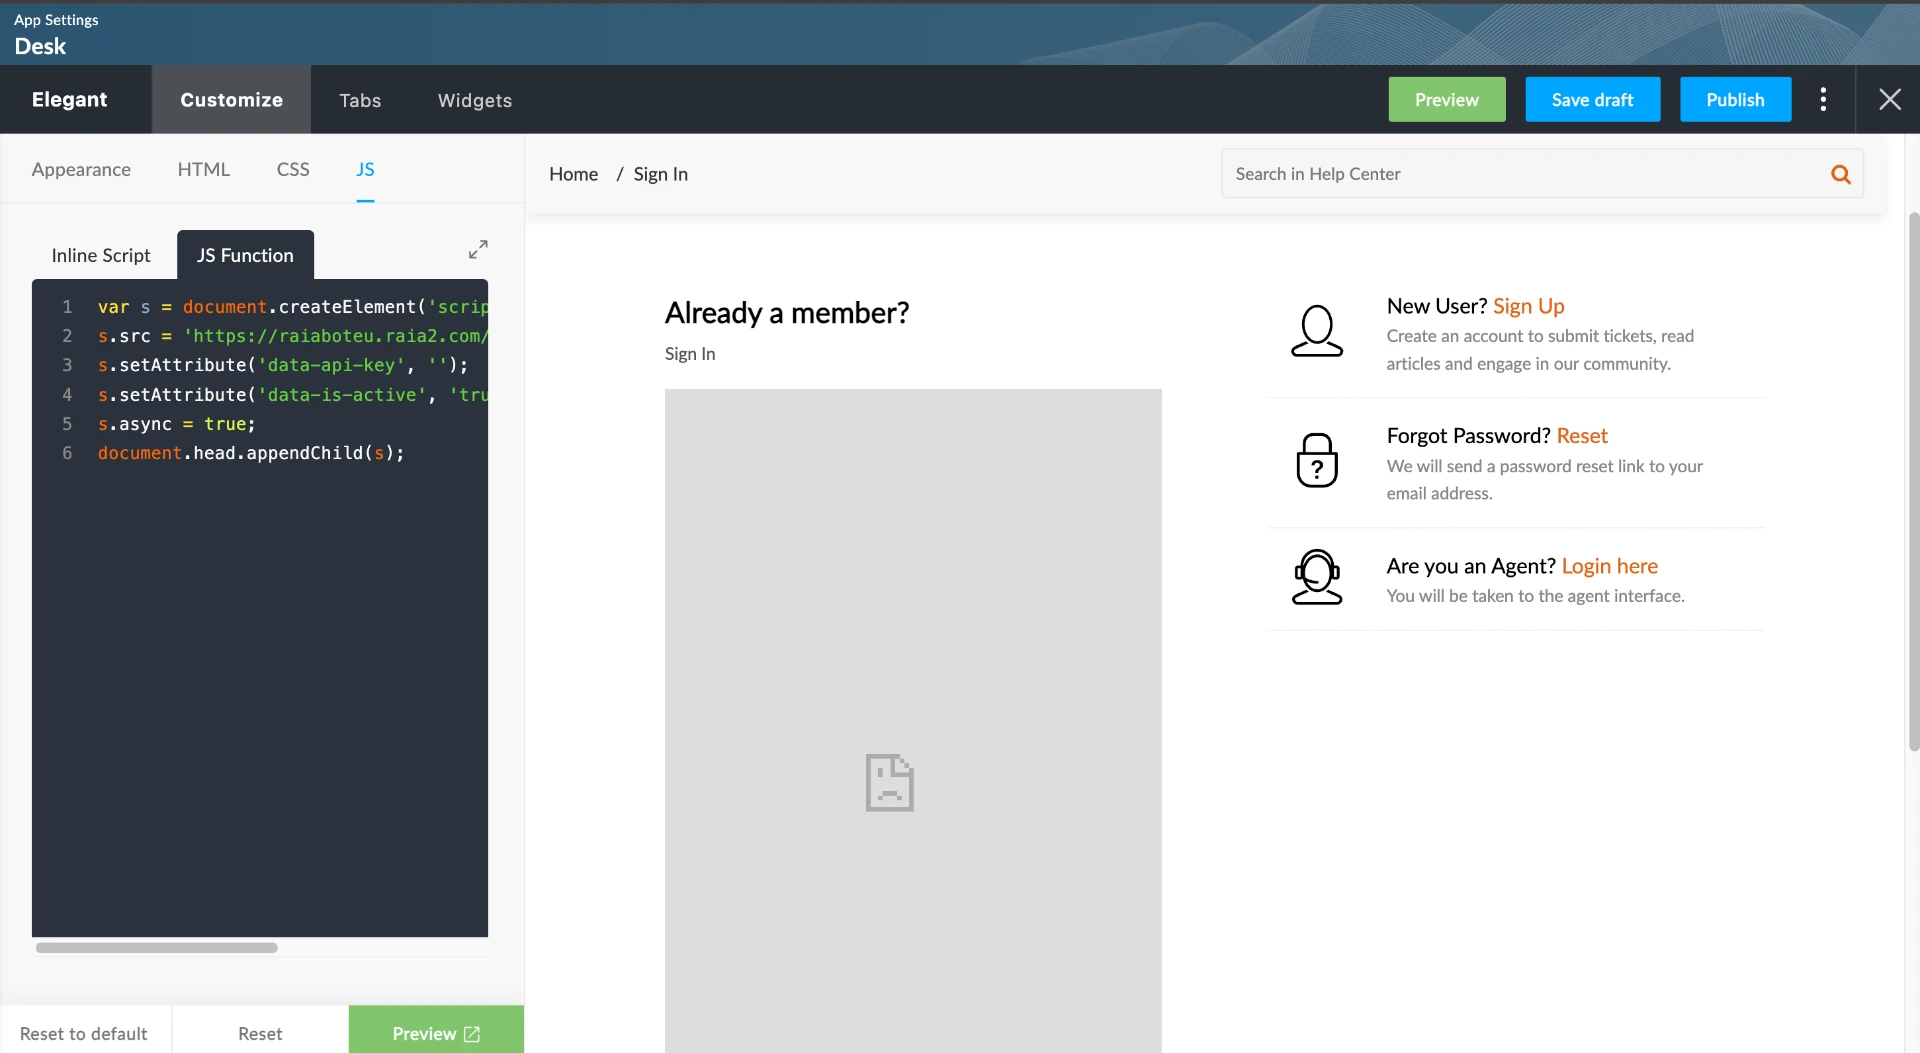
Use the right region domain
https://raiaboteu.raia2.com/assets/raia-chatbot-widget.js. US-hosted agents use https://raiabot.raia2.com/assets/raia-chatbot-widget.js. Loading the wrong region returns an unauthorised agent.What the loader does
| Line | Purpose |
|---|---|
document.createElement('script') | Builds the script element in JavaScript instead of in markup, so the Help Center's HTML sanitiser never sees a third-party script tag. |
s.src = '…/raia-chatbot-widget.js' | Points at the raia widget bundle for your hosting region. |
data-api-key | Identifies which agent answers. This is a public agent identifier, safe to expose in the browser. |
data-is-active | Set to 'true' so the widget initialises and renders the launcher as soon as it loads. |
s.async = true | Loads the widget without blocking the Help Center page render. |
document.head.appendChild(s) | Injects the script at runtime, after the portal page has already been served. |
Verify the install
- 01Open the published Help Center in a normal (non-admin) browser session.
- 02Confirm the raia launcher renders in the corner of the page and opens on click.
- 03Open DevTools → Network and confirm
raia-chatbot-widget.jsreturns 200. - 04Send a test message and confirm the conversation shows up in raia Copilot.
Troubleshooting
The widget still doesn't appear after publishing. What now?
The console shows a Content Security Policy error even with the JS Function method.
Can I use the Live Chat Security Key here?
Does this method support the rest of the SDK commands?